How I Created My Own Authentication System
Implementing Custom Auth in Projectree

I'm Danidre, an author, game programmer, web developer, and software engineer!
Overview
If you want to skip straight to the tutorial section of this article, click here: How to create a custom implementation system in Fastify
Introduction
Last July, I participated in the PlanetScale x Hashnode Hackathon, and created Projectree using a custom JavaScript SPA library on the frontend, Django on the backend, and PlanetScale as the database. I had worked on the frontend, and teamed up with Sophia who worked on the backend.
Projectree is a service that you can use to create simplified showcases of projects you have worked on.
Since then, I had plans to continue working on Projectree, but unfortunately, Sophia was no longer able to continue working on it with me. Thus, I had to work on the backend myself.
Modifying Projectree's Backend
Sophia used Django and Django ORM for Projectree's backend. Honestly, I was able to scan the source code on GitHub and understand how she made everything work, but I had no idea how to begin restructuring everything to develop it for my specific plans and goals for Projectree.
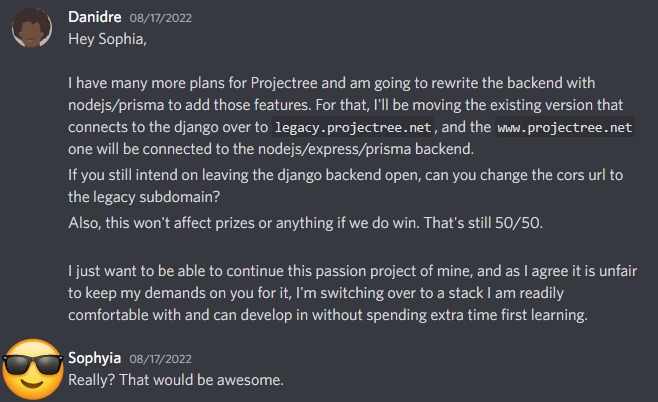
I decided to remake Projectree's backend myself, so I could have full control of the stack, and understanding of how to further customize it. I told Sophia about it, who was quite supportive of the idea. I changed the existing projectree frontend domain to https://legacy.projectree.net and she enabled the Django backend's CORS for that domain.
The Django backend is actually deployed to Heroku with their free dynos, but by November 28th, this form of hosting will no longer be possible. By then, the Django backend will most likely be sunsetted as well.
Then I started recreating the backend.
Choosing a Stack
Projectree's plans exceeded the existing capabilities possible at the end of the hackathon, so to achieve them, I needed something I was familiar and comfortable with. My go to tech stack is NodeJS, Express, MongoDB, but I wanted to try something new as well.
For the new backend, I decided to use (and learn) NodeJS, Fastify, Prisma, and SQLite.
Why I chose each option
Fastify
Projectree's backend acts more like an API, that accepts requests and sends responses. Fastify is better suited for APIs since it is fast, and not as bloated as Express.
Prisma
One thing I passionately detested about SQL databases, is the migration process.
It was for this reason that I teamed up with a backend developer; they can battle with databases, and I will focus on the frontend.
However, most of the data in Projectree is relational, so a relational database would be a more suitable choice.
Prisma allows you to use many databases such as PostgreSQL and MongoDB, and it would manage database migrations, and changing schemas for you. Additionally, it provides very intuitive APIs for querying data, creating records, and much more.
SQLite
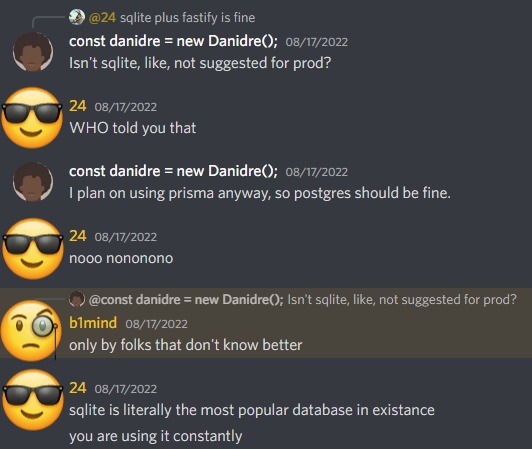
Although Prisma removes the tedious migration work for me, I still need to set up databases both locally and in production (whether I used MySQL, MariaDB, PostgreSQL, etc). I was trying to avoid that setup, and decided to use SQLite. It was boasted as being super fast, with no tedious setup, and can reside right in your application directory.
Many developers on discord advocated for its usage:
Creating an Auth System
Projectree's first backend used Django, and came with its own authentication system, which made developing easy, as it allowed for easy integration with the database using Django ORM. I needed to remake this in Fastify.
From previous projects, I only had experience with Express' Passport middleware for authentication, using its local strategy.
The local strategy allows you to authenticate using a username and password, rather than an OAuth method that uses Discord, Facebook, Twitter, Gmail, etc to sign in to the account.
At first, I tried looking for a passport middleware counterpart for Fastify or using a Fastify specific authentication library, but in the attitude of learning new things, I decided to learn how to implement authentication of my own.
What is auth?
Auth is used both when talking about authentication, and authorization. Authentication deals with determing the identity of the person making the request, and authorization deals with whether the authenticated person can perform a requested action or not.
Auth can be implemented in multiple ways such as sessions or JWTs, and each method has their pros and cons. For Projectree, I decided to use sessions.
The general idea
The server is generally able to determine who is making a request through some form of identifier. When the user logs in (is authenticated), they are assigned an identifier, which they use in subsequent requests. The server will verify that the identifier is valid while processing each request, and perform different actions based on whether the user is allowed (is authorized) to make that request or not.
My custom auth theory
Middleware like Passport allows for a session store (like a database) to store the session details of the users. However, as I was implementing my own auth, I did not want to additionally handle storing sessions in a database, setting schemas, etc. As a result, I opted for storing the session identifier in the client's cookie when they sign in (for authentication); and then checking that cookie per request for authorization. Then, when the client logs out, that cookie will be destroyed.
Trivia: I honestly do not fully understand how the server keeps track of the sessions for anonymous users, even. Maybe the existing libraries simply set and read cookie variables, so a repeating request identifies them. Maybe it involves the TCP handshake of the client and server, and they are able to recognize the client's subsequent request because...of magic?
Addressing Security Concerns
While this method seems simple, there are many flaws to it:
- Clients can modify their cookies, which means a malicious user can modify their session details to be someone else.
- Clients can read their cookies. Third party scripts would then be able to execute scripts that send cookie data to their own malicious data centers.
- Data can be accessible through
http(unsecure) connections. - Cross site request forgeries (CSRF) can occur where a bad site perform an action through your good site, which sends your cookies, and the server is unable to determine whether it is a legit authenticated request, or a forged authorized one.
To address these, I made the following configurations with the cookies:
- Enable
httpOnlycookies. That way, only the server can access and modify the cookies. - Enable
securecookies. That way, cookies will only be sent onhttps(encrypted) connections. - Use a cookie
secret. Existing libraries allow a cookie secret that can be used to sign the cookie. That way, the server will be able to determine whether the cookie was manually modified by another source than itself.
Some libraries also garble the cookie data when signed, so it is not human readable; however, the general practice is to not store sensitive information in the cookie in any case. - Set the
sameSiteattribute to"lax"or"strict". These help the browser decide whether to send cookies along with cross-site requests, which can mitigate CSRFs.
To distinguish between the Strict and Lax sameSite values, check this OWASP resource.
Implementation Code
The remainder of this article could be read more as a tutorial instead.
How to create a custom implementation system in Fastify
Unlike other tutorials that build a mini application along with the auth code, this one will simply focus on the auth code, with assumptions and pseudocode in other places.
0) Prerequisites
This tutorial uses NodeJS, so ensure you have nodejs installed.
1) Install the dependencies
For this tutorial, the main packages/modules you will need are fastify, fastify's secure session, and fastify plugin.
npm i fastify @fastify/secure-session fastify-plugin
fastify: The web framework we are creating the API with.@fastify/secure-session: Creates a secure stateless cookie session for Fastify.- I chose this over
@fastify/sessionbecause this module stores the session data in the client's cookie, instead of requiring a database like@fastify/session. - I also chose this over
@fastify/cookiebecause the syntax of accessing and modifying the cookies with this library was easier than@fastify/cookie.
- I chose this over
fastify-plugin: A module that you use to allow your plugin to be accessible throughout the intended Fastify contexts.
2) Create your server file
Next, you create your main server file (server.js) and add the following code to it:
// server.js

const fastify = require("fastify");
const fastifySecureSession = require("@fastify/secure-session");

const secureSessionConfig = {
    secret: process.env.COOKIE_SECRET || "averylogphrasebiggerthanthirtytwochars",
    cookie: {
        path: "/"
    }
}
if (process.env.NODE_ENV === "production") {
    secureSessionConfig.cookie.secure = true // serve secure cookies
    secureSessionConfig.cookie.httpOnly = true // serve cookies only accessible by the server
    secureSessionConfig.cookie.sameSite = "strict"; // serve cookies only from site
}

const app = fastify({ignoreTrailingSlash: true});

app.register(fastifySecureSession, secureSessionConfig);

app.listen({ port: process.env.PORT || 3000 }, (err, address) => {
    if (err) {
        app.log.error(err);
        process.exit(1);
    }
    console.log("Server started on address " + address);
});
Here we have a basic Fastify server, with a few modifications in preparation for the custom authentication;
First we import fastify and @fastify/secure-session, and initialize them accordingly. Notice that we create a secureSessionConfig object with the options to use with fastify's secure session.
I added the
ignoreTrailingSlashproperty so urls likeexample.com/homeandexample.com/home/both point to the same request handler.
As explained before, we provide a secret to be used for signing the cookie, and in a production environment, we want the cookies to be secure, httpOnly cookies with sameSite "lax" or "strict". Additionally, we want the default path of the cookies to be at the root of the application.
Trivia: I originally left out this
pathproperty, but experienced unexpected behaviours in my application: Multiple session cookies were being set on different paths, making multiple users authenticated on the same device, depending on which endpoint was being fetched.
Then we start the server with app.listen.
3) Create your custom auth module
After that, we want to implement our custom authentication system. We will extend the functionality of Fastify's flow by managing the sessions set in @fastify/secure-session in this file. For that, we use fastify-plugin. Let's create a customAuth.js file in the same directory as the server.js file and add the following code:
// customAuth.js

const fp = require('fastify-plugin')
async function customAuth(fastify, options) {

    fastify.decorateRequest("user", null);
    fastify.decorateRequest("isAuthenticated", null);
    fastify.decorateRequest("logIn", null);
    fastify.decorateRequest("logOut", null);

    fastify.addHook("onRequest", (req, res, next) => {
        const getUser = () => {
            try {
                const user = req.session.get("user");
                if (user) {
                    return user;
                }
                return null;
            } catch {
                return null;
            }
        }
        req.isAuthenticated = () => {
            return !!getUser();
        }
        req.logOut = () => {
            req.session.set("user", undefined);
        }
        req.logIn = (data, cb) => {
            const done = function (error, user) {
                if (error) {
                    if (cb && typeof cb === "function")
                        cb(error, user);
                    return;
                }
                req.session.set("user", user);
                if (cb && typeof cb === "function")
                    cb(null, user);
            }
            try {
                if (customAuth.authenticate && typeof customAuth.authenticate === "function") {
                    customAuth.authenticate(data, done);
                } else {
                    if (cb && typeof cb === "function")
                        cb("Cannot authenticate. No authentication method found.", null);
                }
            } catch (err) {
                if (cb && typeof cb === "function")
                    cb(err, null);
            }
        }
        req.user = getUser();
        next();
    });
}

customAuth.useStrategy = (strategy) => {
    if (strategy && typeof strategy === "function") {
        customAuth.authenticate = strategy;
    }
}

module.exports = fp(customAuth);
As suggested by Fastify's Docs, decorateRequest is used to allow the underlying JavaScript engine to optimize the handling of the objects sent in the context of requests. Since we modify the request's user, isAuthenticated, logIn and logOut objects in our custom auth module, I decorate those on the request object.
The onRequest hook (fastify.addHook("onRequest"...) is where our custom authentication's value comes in. Fastify Hooks allow you to listen to specific events in the application, and we can use the onRequest hook to intercept each incoming request and modify it accordingly, before passing it on to the rest of our application to manage.
When each request is received, our custom auth checks the request's session user property to determine whether a value exists (getUser returns the user) or not (getUser returns null).
Afterward, we decorate the request with an isAuthenticated function that can be used in any later API handlers.
Then, we also add logOut and logIn functions that takes the applicable data and modifies the session with that authenticated user or not, so future requests will have that session's data in them.
Finally, we populate the request's user property with the specific user, again for easy usage in a later API handler.
Our unopinionated auth system
Our custom auth focuses on setting cookies when a log in was successful, deleting cookies when a log out was called, and allowing later request handlers to get the requesting user's details. It does not determine how to authenticate the user. That is left up to the developer to decide.
For that, our custom auth exposes a useStrategy function, where the developer passes a stragety for authenticating a user. This is where the developer can check their database, compare encrypted passwords, and more. When successful, the developer can call the done function provided in the logIn method, which will authenticate the user and run the specific callback function (where the developer can redirect to another page, for example). If the first parameter is truthy, it will be considered an error, and that would mean the authentication failed. Otherwise, the authentication should be successful and the session's user property will be the data provided in the second parameter.
4) Use the custom auth in our application
Now that we have created the module, let's import and use it in our server.js file:
// server.js
const fastify = require("fastify");
const fastifySecureSession = require("@fastify/secure-session");
const customAuth = require("./customAuth"); // < added line

// .. other code

app.register(fastifySecureSession, secureSessionConfig);
app.register(customAuth); // < added line
Important: Since our custom auth module relies on
req.session, it is important toregisterfastify's secure session module before our custom auth module.
Next, let's initialize our custom auth strategy before attempting to use it in our request handlers:
// server.js

app.register(fastifySecureSession, secureSessionConfig);
app.register(customAuth);

// added chunk
customAuth.useStrategy(async (data, done) => {
    const { username, password } = data;
    try {
        const user = await database.user.find({username, password}, {id, username, password});
        if (!user)
            return done("User does not exist");

        if(passwordVerifier.verify(password, user.password)) {
            return done(null, { id: user.id, username: user.username });
        } else {
            return done("Username or password incorrect");
        }
    } catch (err) {
        return done(err);
    }
});

app.listen...
Our strategy will accept a username and password, and compare it to existing data in a database of our choice, then verify the matching passwords and call done based on whether the user was found with a matching password (user authenticated) or not (user not authenticated).
For validating passwords, you can use packages like
bcrypt.
Finally, let's create some routes that uses our auth system:
// server.js

app.post("/signin", (req, res) => {
    if (req.isAuthenticated()) {
        res.send({ message: "Already signed in" });
        return;
    }
    try {
        const { username, password } = req.body;

        req.logIn({ username, password }, (error, user) => {
            if (error) {
                res.send({ error });
            } else {
                res.send({ success: true, user });
            }
        });
    } catch {
        res.send({ message: "Sign in failed" });
    }
});

app.post("/signup", async (req, res) => {
    if (req.isAuthenticated()) {
        res.send({ message: "Already signed up" });
        return;
    }
    try {
        // validate request

        // .. other code
    } catch {
        res.send({ message: "Sign up failed" });
    }
});

app.delete("/signout", (req, res) => {
    if (req.isAuthenticated()) {
        req.logOut();
        res.send({ success: true });
    } else {
        res.send({ message: "Already signed out" });
    }
});

app.listen...
Since these requests handlers are defined after the authentication module was imported, registered, and strategy initialized, each handler has access to our custom auth's decorated properties.
Sign In Code Explanation
In the sign in handler, we first check to see if the user is already logged in, using the decorated req.isAuthenticated method. Internally, the custom auth module checks the session properties for that existing cookie and returns true or false on whether it exists.
Then, we call the req.logIn method, passing the username and password we want to use in our authentication strategy we defined above. Internally, the custom auth module executes our authentication strategy, comparing the information to what we have in our database, just like we set it to.
In the req.logIn callback, we also handle the response provided by the internal done function; If no user exists, the error is sent to the user. Otherwise, a success response is sent, as the user is signed in. If the log in is successful, internally, the custom auth sets the session's user property to be that user, so that cookie value will be included in future requests, and the server will be able to determine that the user is authenticated correctly.
Sign Up Code
This one is left up to the developer's implementation, but note that I use the req.isAuthenticated method again as part of the request handling flow. In this case, logged in users are not authorized to create new accounts; we do not want to handle signing up a user when they are already logged in.
Of course, depending on your application, you can omit this code block.
Sign Out Code Explanation
This request handler is simple; it calls the decorated req.logOut method if the user is logged in. Internally, the custom auth module will delete the session's user properties, so the cookies won't exist on future requests.
Tutorial Conclusion
There you have it! Your own custom authentication system in under 100 lines of code, that allows you to define your own authentication strategy, and manage authorization in your request handlers.
Here is the full code (and pseudocode) for review:
server.js

const fastify = require("fastify");
const fastifySecureSession = require("@fastify/secure-session");
const customAuth = require("./customAuth");

const secureSessionConfig = {
    secret: process.env.COOKIE_SECRET || "averylogphrasebiggerthanthirtytwochars",
    cookie: {
        path: "/"
    }
}
if (process.env.NODE_ENV === "production") {
    secureSessionConfig.cookie.secure = true // serve secure cookies
    secureSessionConfig.cookie.httpOnly = true // serve cookies only accessible by the server
    secureSessionConfig.cookie.sameSite = "strict"; // serve cookies only from site
}

const app = fastify({ ignoreTrailingSlash: true });

app.register(fastifySecureSession, secureSessionConfig);
app.register(customAuth);

customAuth.useStrategy(async (data, done) => {
    const { username, password } = data;
    try {
        const user = await database.user.find({ username, password }, { id, username, password });
        if (!user)
            return done("User does not exist");

        if (passwordVerifier.verify(password, user.password)) {
            return done(null, { id: user.id, username: user.username });
        } else {
            return done("Username or password incorrect");
        }
    } catch (err) {
        return done(err);
    }
});

app.post("/signin", (req, res) => {
    if (req.isAuthenticated()) {
        res.send({ message: "Already signed in" });
        return;
    }
    try {
        const { username, password } = req.body;

        req.logIn({ username, password }, (error, user) => {
            if (error) {
                res.send({ error });
            } else {
                res.send({ success: true, user });
            }
        });
    } catch {
        res.send({ message: "Sign in failed" });
    }
});

app.post("/signup", async (req, res) => {
    if (req.isAuthenticated()) {
        res.send({ message: "Already signed up" });
        return;
    }
    try {
        // validate request

        // .. other code
    } catch {
        res.send({ message: "Sign up failed" });
    }
});

app.delete("/signout", (req, res) => {
    if (req.isAuthenticated()) {
        req.logOut();
        res.send({ success: true });
    } else {
        res.send({ message: "Already signed out" });
    }
});

app.listen({ port: process.env.PORT || 3000 }, (err, address) => {
    if (err) {
        app.log.error(err);
        process.exit(1);
    }
    console.log("Server started on address " + address);
});
//customAuth.js

const fp = require('fastify-plugin')
async function customAuth(fastify, options) {

    fastify.decorateRequest("user", null);
    fastify.decorateRequest("isAuthenticated", null);
    fastify.decorateRequest("logIn", null);
    fastify.decorateRequest("logOut", null);

    fastify.addHook("onRequest", (req, res, next) => {
        const getUser = () => {
            try {
                const user = req.session.get("user");
                if (user) {
                    return user;
                }
                return null;
            } catch {
                return null;
            }
        }
        req.isAuthenticated = () => {
            return !!getUser();
        }
        req.logOut = () => {
            req.session.set("user", undefined);
        }
        req.logIn = (data, cb) => {
            const done = function (error, user) {
                if (error) {
                    if (cb && typeof cb === "function")
                        cb(error, user);
                    return;
                }
                req.session.set("user", user);
                if (cb && typeof cb === "function")
                    cb(null, user);
            }
            try {
                if (customAuth.authenticate && typeof customAuth.authenticate === "function") {
                    customAuth.authenticate(data, done);
                } else {
                    if (cb && typeof cb === "function")
                        cb("Cannot authenticate. No authentication method found.", null);
                }
            } catch (err) {
                if (cb && typeof cb === "function")
                    cb(err, null);
            }
        }
        req.user = getUser();
        next();
    });
}

customAuth.useStrategy = (strategy) => {
    if (strategy && typeof strategy === "function") {
        customAuth.authenticate = strategy;
    }
}

module.exports = fp(customAuth);
And that's it! Now you know how to implement custom authentication in your own application!
Trivia: If you are familiar with Passport, many of the exposed decorated functions may look similar, and that is because...again...most of my prior experience with auth is using Passport and its local strategy.
Some topics were not covered in the tutorial, such as hiding sensitive environment variables (using packages like dotenv), or other best practices, because that was not the focus of the tutorial. However, do be sure to follow such best practices in your own projects.
Theory Refresher
Auth is about determining who made the request, and if that person is allowed to perform an action or not. We authenticate our users by storing their ID in a secure, httpOnly cookie, signed with a secret, and CSRF mitigated with a "lax" or "strict" sameSite value. Then, we created an unopinionated authentication system that accesses and modifies those cookies for us, and provides functions for us to use in our request handlers to determine how to authenticate and authorize users ourselves, no matter what databases or flow we use.
The benefit of this theory is that, even if you are using another NodeJS web framework (such as Express) or another language entirely, you'll be able to follow along and create your own authentication system.
Assurances
As a developer that switched from primarily using an authentication library to creating one myself, you may wonder whether my custom implementation may have flaws the existing libraries covers/fixes?
However, before attempting this implementation, I had 2 years prior of implementing authentication in different applications, where I mostly used PassportJS. For this library, I took about 2 weeks researching the topic, which involved reading blogs, articles, and documentation on authentication, discussing it with Discord peers, watching YouTube Videos, and more. I also took a look at the source code of the @fastify/passport module, and surprisingly enough, it is very similar to how I implemented auth myself. Thus, I am a bit certain about what I've created.
And if I am completely wrong, please feel free to educate me! 🙏🏾
Disclaimers
Authentication always seems easy, but there are a few gotchas that have terrible consequences if you are not aware of them. It is possible that I have not covered all cases either, so please let me know in the comments.
While assured, this code has not been battle-tested in a production environment for robustness. I encourage you to do your own additional research before creating your own authentication systems as well. For that, I generally recommend reading the various OWASP resources. There are many more layers of defense that can be implemented (such as CSRF Tokens) to protect users in a more robust way, and such resources can help guide you.
Alternatively, I encourage you to use an existing battle-tested auth library instead.
Conclusion
After implementing authentication of my own, I was able to continue working on Projectree's new backend. Since I decided to learn new tools, I spent about a month rewriting the backend to bring it up to the current Django version. The results from the hackathon have already been released; I no longer need to keep it on PlanetScale's databases, so I've deployed it on Linode.
Unfortunately, our project did not receive a winning prize in the hackathon, so when Heroku's free dyno tiers end, we will not have the funds to support it on a paid tier anyways, so the change in deployment was the more convenient decision.
I plan to continue working on Projectree in the future, so feel free to check it out and use it!.
Stay tuned throughout the next 2 weeks for more articles like this!
Thanks for reading!


